Local Bike Shops

Around the horn on local bike shops

I recently took a little road trip to local bike shops, two of which I hadn’t been to yet.  So far I’ve been a diligent Royal Distributing
customer,  they are closest and offer a big selection.  It’s pretty much serve yourself, and the kids working there don’t seem to know too much about riding as opposed to selling stuff.  They also tend toward cheaper, mainstream gear.

To expand my options I thought I’d drop by A Vicious Cycle in New Dundee (great name) and Tri-City Cycle in Waterloo.

A Vicious Cycle had knowledgeable guys on the counter who were less focused on a quick sale than giving me good advice.  They knew what they were talking about and took the time to figure out what I needed (as opposed to what I’d seen online).  I think I might have found my new favorite bike shop.

Tri-City Cycle is a motorbike dealer, so the main building is all about selling bikes.  There is a small room in a building in the back that sells gear, but I found the selection quite limited and the vibe was quick sell, though the guy there did know of what he spoke.  Like Royal Distributing, Tri-City has a more mass market vibe; it was stuffed with product moving through.

My new favorite

A Vicious Cycle (which I never get tired of saying) was clean, well stocked but organized and, as mentioned, the sales support was excellent.  I’m going to go for the Macna summer pants they have on offer.  They seem to be of excellent quality and are by a European manufacturer that aren’t the same same old brands pushed everywhere else.  Most importantly, the knowledgeable and patient sales guy took the time to show me a pair and how they work.

I’d never suggest going to a single retailer for all your gear.  At various times different retailers will have what you’re looking for on sale or on hand, but when you find a place that you like, it’s nice to know you have a first go-to that won’t let you down.

Follow Up

I got the Macna summer pants and they are excellent.  I ordered online, A Vicious Cycle sent me updates so I knew where things were in the delivery cycle, and I received my pants a day before they said I would.  The pants themselves are very high quality and unique looking compared to the matt black look popular in North American gear.  Unlike the Joe Rocket pants I tried which are far too long in the leg, the Macna’s fit me perfectly, off the rack.  Between the the quality of the online service and quality of the product, I’m very happy with A Vicious Cycle.

The Triumph Tiger 800: the bike I’ll get hard luggage for

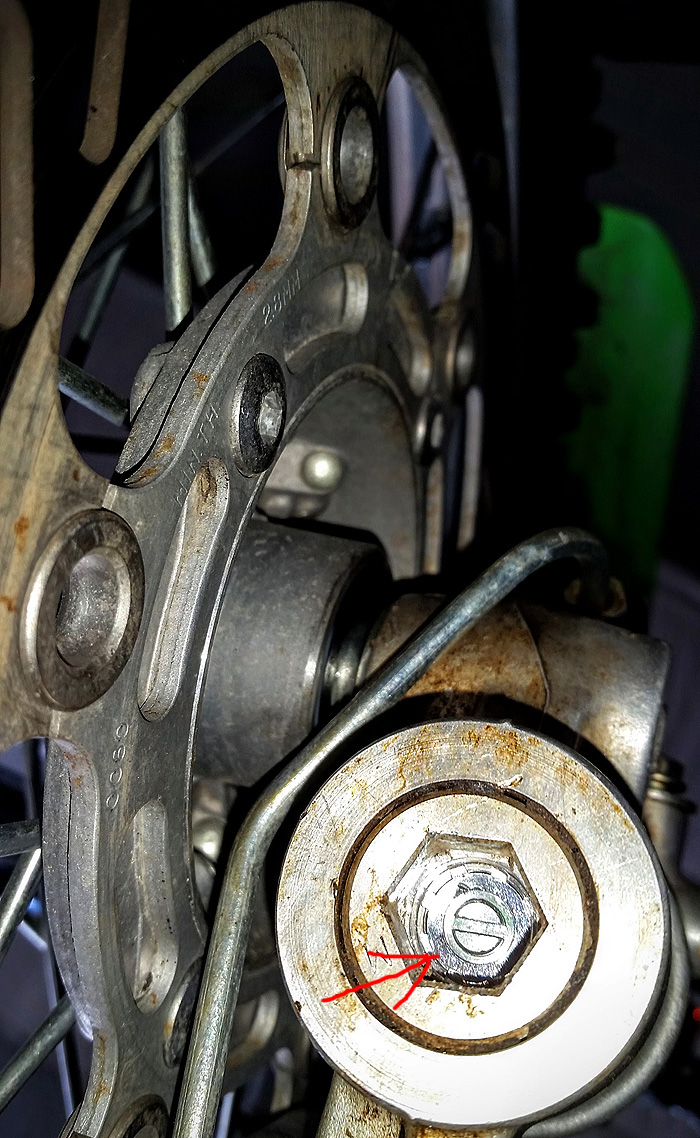
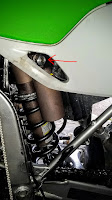
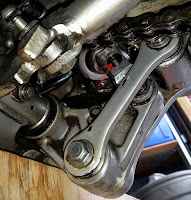
Thanks to their honest advice about how much I’d need to put into getting a hard luggage rack that works well with the Ninja, I’ve decided to go with a tail bag and save the carrying gear for a future bike more suited to the task.

In the meantime, I can’t say enough about the quality of those Macna pants.  They breath like crazy, even on hot sunny days, and because they aren’t black they reflect their share of heat as well.  If you’re looking for a summer pant, these are excellent!

Bike Evolution

I’ve been pondering motorbikes as the season ends here in Canada and the darkness closes in.  I’m only 300 miles away from putting the Concours over the thirty thousand mile mark, which has been the goal this year.

The Concours has been a revelation.  This year I’ve gone international with it, doing thousand mile trips and circumnavigating great lakes.  I continue to modify and adjust, making it more and more long distance worthy.

Surprisingly, I’m finding it very satisfying in the twisties, and that 999cc Ninja motor wails like a banshee if you wind it up, so there is no lack of visceral thrill in riding it.  So satisfying is it that I’m left wondering what more I’d need in a road bike.

That’s where the KLX came in.  As an off-road tool it’s purpose built, but I’m finding that I don’t have the time or the local access to dedicate to off road riding.  I enjoy it, but the cottage I was thinking of using it at isn’t really that accessible and other than riding around on dirt roads, I’m finding it difficult to justify, especially for what it cost.

There is also the culture side of it.  I get a nostalgic jolt out of the idea of riding a classic Scrambler all over the place, but MX riding?  Not so much.  It all seems a bit Ricky Racer to me.  I like green laning, and trail riding, but I’m not so much about the radical off road stuff, so a less MX like bike would do the trick.   One that scratches that nostalgic itch at the same time would do double duty…

Triumph’s Bike Configurator makes dreaming a bit too easy…


Maybe next year will evolve into a Scrambler while running the ever present Concours – a sport tourer and a multi-purpose classic would each get a fairer share of the time I can dedicate to the saddle.


The new Bonneville/Scrambler is something else again:

Bigger motor, lighter bike.  The 2016 Bonneville Scrambler is a piece of fast art!


Kawasaki KLX250 Suspension Adjustment

I can pick the thing up, so lifting up the wheels isn’t the ordeal
it is on the massive Concours. To get both wheels up I used
a wooden box on a jack and some jack stands on the back.

Today I had a go at the suspension of the KLX250.  The previous owner is a much smaller fellow than me, so he had the suspension at stock levels (preset for a 150lb rider with no luggage or passenger).  For a big guy like me (6’3″, 240lbs) the front was wallowy and the back felt loose.

The suspension adjustments are on the bottom of the forks at the front.  The rear has rebound damping down at the bottom of the shock and compression dampening at the top.


I’ve included photos of each below.  Tightening up the suspension was quick and relatively painless.  The clicks are obvious and about half a turn of the screwdriver each.  After cleaning up with wd40, I had no trouble turning any of them.


Click on any of the photos to get a bigger image.

front forks

On the bottom of the front forks you’ll find a hexagonal opening.  There is a rubber cover in there.  It’s designed with a flat edge and pops out easily with a small, flat screwdriver.  Inside you’ll see a small, flat headed bolt.  Each half turn creates an obvious click.  I turned each side clockwise four clicks.  No more wallowing, and the forks feel tighter on cornering.  On braking I get a single, less pronounced drop.  That was a quick fix.


compression damping
adjuster


rebound damping adjuster

 rear suspension

The rebound damping adjuster is on the side of the bottom of the shock housing.  It gets dirty under there so wiping it down first helps in finding things.  It’s easy to get a flat screwdriver on the adjuster bolt, and it turns easily. The clicks are obvious, I turned it up (clockwise) four clicks.

The compression damping adjuster is obvious behind the cutout in the fairing.  It was tucked in behind an electrical connector on mine which easily pushed aside.  Since it’s out of the muck, this one doesn’t get dirty.  The clicks were again obvious – I turned this one up four clicks as well.

I then took the bike for a quick ride to get gas.  On the road it corners more tightly with none of the previous wallow.  On the way back I tried to ride as directly as I could rather than follow the roads.  I got to the end of pavement in a subdivision and found myself on a deeply rutted dirt road which led to a hydro station.  I then nipped down a walking path to the road behind my subdivision.  This bike is so quiet a rabbit was surprised when I puttered by.  There is a large dirt pile where I came out of the bush so I zipped up it and back.  Off road the bike is much tighter.  There is still a lot of suspension travel, but I could feel what the wheels were doing much more clearly, the bike just feels tighter.  I was just hoping to calm the wallow.  That happened, but the whole bike dynamically feels so much more suited to me now.

Now that I know where the bits and pieces are, I’m intending to keep monkeying with the settings to get it customized to my size and preferences.  With the settings that easy to play with, why not?

The Kawasaki KLX250 Owner’s Manual


Touring Ninja redux

I’ve been doing some research on a topbox for the Ninja again.  Having a permanent carrying option would allow me to make the bike more usable on long trips by giving me lockable storage on the bike.  It would also give my son a more comfortable and secure pillion with a backrest.  If I could take him with me on some extended day trips we’d be able to make some miles this summer.

I’d initially thought of getting a bigger bike for two upping with my son, but the cost of insurance on larger cc bikes for new riders and the doubling up of insurance when you own two bikes (though you can only ride one at a time) has put that on hold.  In the meantime, perhaps some storage on the Ninja would make it a bit more useful as a tourer.

Givi is pretty detailed in how to apply its luggage to my particular Ninja.  I went to them first to figure out what the hell the difference between monolock and monokey luggage is.  Basically, Givi monokey is the heavy duty kit and monolock is the light duty system.  Monokey can be switched between top and pannier duty as well as being built heavier and tougher.  Monolock is topcase only and meant for smaller bikes doing lighter duty.  Think monokey for a big touring bike with lots of luggage and monolock for sports bikes, smaller bikes and scooters.


Givi suggestions for a Ninja 650r ’05-’08:
http://www.giviluggage.co/givi-product-focus/bike-overview-kawasaki-er6-nf-05-08/


What I need for the Ninja Topbox:


Not bad for turning the Ninja into a two up tourer and long distance traveller.  I see some Givi luggage coming from A Viscous Cycle in the near future.

Behold! The Essay-inator!

In this corner, weighing in as the inevitable future, I give you: the writing algorithm!
… and in this corner, weighing in as a lazy, nineteenth century habit that no one can shake: tedious, overly structured High School English writing!


The trick is going to be creating an algorithm that plagiarism checkers won’t catch.  That shouldn’t be too hard as they tend to look for matching text, and any good algorithm would put the pieces together in varying ways depending on the variables given.


With a proscribed structure similar to sports stories or financial reports, it should be fairly easy to get Narrative Science to modify their writing engine to accept key points and put together a five paragraph essay that perfectly follows the tediously exact, point-proof-explanation requirements of high school essay writing.


The process should go something like this:

  • student logs in to the website and enters brainstorming ideas based on a cursory reading on the subject matter (Macbeth should be covered in 20 minutes, tops)
  • thesis (an arguable statement) is generated based on ideas given (or offered, depending on how much you want to put into this)
  • supporting points are suggested.  The algorithm places them in order of importance based on the number of hits and positive previous reviews, student picks the ones that grab them
  • the algorithm finds quotes from the play and lit crit that relate to each supporting point
  • body paragraphs are constructed following point/proof/explanation around chosen quotes
  • introduction and conclusion are generated based on body paragraphs
  • student reviews the paper for vocabulary or wording that doesn’t suit their style
  • if too complicated a word is used, the student can right click and get a list of synonyms
  • the completed paper, using variable data, is unique, and presented in the vicinity of the student’s knowledge of the subject matter, working vocabulary and writing style
Behold my essay-inator!

The point and click essay is finally here!


The efficiencies here should be obvious.  A typical paper requires hours of reading, then re-reading looking for quotes, then formulation of ideas, then organization… hours and hours!  This process could have a student sit down with a Shakespearean play they’ve never seen before, and have a finished essay completed in under an hour, on their smartphone!

They are still the authors, we’ve just taken the tedium and soulless nature of high school writing and given it to a machine, which only seems fair.

***

This is written facetiously, but it does raise a couple of interesting questions.  If high school writing requires such heavy duty plagiarism checking and tends to be about the same subjects using the same formats, and marked with the same rubrics year after year, what is the point?

If these guys have come up with an algorithm that can write data driven, structurally sound pieces this well, how long will it be before someone has put together a five paragraph essay-inator?  The only thing more soulless and formulaic than financial writing or sports reporting is high school English writing.  Time to let the computers do what they do best and take this repetitive, tedious work and do it more efficiently!

Up next, mechanized marking of essays: time to take the tedium out of being an English teacher!

If this works out well, we’ll be able to have students ‘write’ essays, and have them ‘marked’ in a matter of seconds!

Now that’s progress!


3d modelling madness

I got a Structure 3d scanner this week at work. We’re using it there for all sorts of educational activities, but I find myself painting the various Kawasaki products in my garage.

This thing costs about $350 bucks and straps on to an ipad.  You walk around your target ‘painting’ it on the ipad screen (it looks like you’re covering it in clay) and then you’re done.  Any of these motorcycle models took about a minute of walking around the bike…


It didn’t take me long to get some remarkably detailed images of the Concours


Because it’s so easy to paint an object and create a 3d model out of it, you tend to try all sorts of angles.


The scanner will also take a swing at rooms, though I’m not so good with them yet.  This is an image of the garage.  The Ninja is on the left, the Concours is further in on the right.

The file generated is basically a list of vertices connected by lines.  The sensor measures distances and constructs a 3d mesh out of them.  The result is a three dimensional image.

How could something like this be used?

You could scan a fairing or other part, get accurate geometry out of it and then modify it digitally before printing out a replacement.


I think I’m about five years away from being able to 3d print my own digitally modelled custom fairings for any bike.  The hold up right now is a 3d printer big enough to manage large prints.  What I’d really like is a high resolution Terminator 2 style Formlabs printer like the one below that’ll print up to fairing sized pieces…

Debates of the Future

The data wranglers sat in a loose circle behind the cameras frantically shaping the data clouds around their candidates. The debating format hadn’t changed too much, but the show certainly had. Parties no longer threw candidates into the ring alone, a successful debate required a huge, group commitment. Candidates, party members of even the general public throwing in prioritized, well timed comments could make or break at debate in the new age.

The lights in the studio blazed on the candidates while they took great care to stay away from the dreaded O.R.L.. Out Right Lies became the killer app, as long as you had a good wrangler and a responsive party. Stating an ORL was a game killer, especially if your wrangler could get the pertinent data on the screen while your opponent was still speaking it. At best you looked ignorant, at worst manipulative and dishonest, if caught speaking a lie as the facts swirled around you to the contrary.
Rehearsals for debates now more closely resembled a football practice, with researchers, commenters and wranglers, than it did the solo focus of pre-crowd sourced debates; debates were now a team sport. What you needed in your party leader was someone who knew what they stood for, didn’t have a lot of mental space for playing a crowd and could reach out and make meaningful contact with people with their rhetoric. The idea of gaming democracy was so fifty years ago.
The real danger came from the audience. The peripheries of the camera shots in three dimensions belonged to the digital crowd. Old fashioned rules surrounding civilized conduct were still strictly enforced, but comments from credible sources carried weight, and if the crowd trended a comment high enough, it could actually impact the size of the data cloud around a candidate. Parties no longer ignored a credible analyst, they feared them. Positive comments could trend very well, but a high trending negative comment could cut like a knife. When the liar tag pushed to the very edge of a candidate in a previous debate, ultimately costing them the election, politicians realized that telling mistruths was a disaster in the making, especially if you were pinned to the lie while you were still speaking it.
Next time around they all tried to avoid saying anything specific, only to be turned on by the mob once again. When given a chance, voters are happy to call their bluff, and did. You can’t speak the nonsense of empty words, or mob mockery would quickly follow. Say what you mean, and mean something. Switching party positions just to try and win votes was likely to get you a face full of contrary video clips from your own lips from previous months. Being a consistent, values driven politician who acted on stated beliefs was your own real protection.
The debate raged on, politics laid bare. Trending thoughts, data in the form of text notes, video links, charts and other statistics appeared and peeled off into separate dialogs on secondary and tertiary feeds, sometimes trending back onto the main feed again. The audience watching the debate could follow the main feed, which looked a lot like the old television version, as it followed the speakers back and forth, or they could follow trending data, a specific candidate or manually direct themselves to any of the camera feeds available.
Data stormed around the candidates as they had to lay it all bare, nothing held back, egged on by the digital mob; gladiators in a fearsomely complicated storm of ideas that everyone participated in.

Frank Lloyd Wright’s House

Lloyd Wright’s only motorbike… he designed 70 odd cars though.

What does Frank Lloyd Wright have to do with motorcycles?  Well, he designed one.  In addition to that one 1930s Harley he also designed dozens of cars, including some pretty iconic ones like the VW Mini-Bus and the original gull-wing Mercedes 300.

I went on a tour around Wright’s house, Taliesin West, in Scottsdale and was blown away by this polymath’s genius.  I’m not that sharp, maybe just bright enough to recognize genius, but it leaves me in awe.  I always end up leaving places like Taliesin West thinking that a big part of genius is just not giving a shit about what other people think.  Free from social constraints geniuses are able to follow their urges and amaze the rest of us with their discoveries.  Just don’t get too close to one.


It’s covered in soot because it belches fire…

From reading Nietzsche to wandering around the Van Gogh Museum to seeing the world Wright made for himself, you can’t help but wonder what it must be like to be that free of social expectation.  That freedom is what Wright exploits to create an aesthetic that is truly iconic and unique.

Being free from the shackles of society, Wright, like Van Gogh and Nietzsche, make a real mess of their lives.  It’s in that glorious mess that their genius is realized.

Sherlock does a good job of showing just how broken genius can be.


Our tour guide told us the story of Taliesin’s water.  They used to haul it up onto the plateau where it’s located (miles from the Scottsdale of the day).  Wright decided he wanted a well dug so he called a guy up and had him dig even though the guy had been up on the ridge before and knew there was no water to be had up there.  


At 200 feet the well digger stopped.  He didn’t have the gear to go any further.  Wright made a fuss and told the guy to go and get what he needed to go deeper.  He finally struck water at almost 500 feet, and Taliesin has had its own water supply ever since (it’s wonderfully cold and tastes fantastic).  Wright never paid the well digger.


You have to wonder how many people geniuses use and throw away in order to express their genius.  Teliesin West is a work of art that needed water and Frank made it happen, but he broke a man’s livelihood in the process.  No one remembers that though and the art lives on.  The social calculus of genius is interesting – many people continue to benefit from Wright’s genius.  The people close to him who paid for it are all forgotten and long gone.


I wish I could go back in time and buy that well digger a beer.  It sounds like he needed one.

The house that Frank built (and didn’t pay for),


Student Driven Curriculum

One of the nice things about teaching computer technology is that you tend to get a lot of fanboys in the class.  They’re already giddy about the subject and keen to explore it (something sadly missing from many English students).  I’m hoping to harness that experience and energy this semester in senior computer engineering.

Ontario Comp-Tech, everything from programming to robotics!

Last summer I took my final, senior computer technology AQ, and we did a fair bit of focusing on curriculum expectations.  Those expectations are so broad that finding a teacher who is an expert in all of them would be pretty much impossible.  Fortunately for me I love being taught by my students (I’m as giddy and curious about comp-tech as they are).

Rather than present yet another linear, teacher-centric semester plan, we’re going to have a con-fab and talk about how to address the curriculum expectations.  They are trapped in the prehistoric tree sap of Ontario Ministry of Education documents which, at best, make for dry, inaccessible reading for students.  To make it accessible I summarized the key points in a prezi.  When the semester starts tomorrow we’re going to self organize around what we need and how we’re going to reach the remarkably diverse goals of the computer technology curriculum.

Hopefully the prezi format will make the goals of the course more accessible and allow us to plan out an approach that gets to all the expectations while allowing students to self direct their learning – a vital skill in an engineer.

There are threads in the course that run through the many diverse fields found in the curriculum document.  The design process is one of those keys to engineering that will serve us well while we plan out how to approach our learning.


The engineering design process is basically a forced feed-back loop that self corrects, leading to a solution.  It would work on everything from essay design to project management – it also leads to successful engineering projects.

If it works for NASA, it’ll work for us!

In our case we’re going to apply it to the curriculum of our courses.  Based on the time we have, access to equipment and experience in the class, we’re going to create a customized, student driven curriculum plan that (I hope) will also encourage student buy in.

I want to make our lab into a maker space, so my focus is going to be on facilitating equipment in order to feed hands on engineering projects.  As long as students are effectively exploring computer technology and expanding both their interests and the breadth of their knowledge, then I’m happy with the process.  My role will be to amplify their learning rather than direct it, and I hope to start that process with a self directed semester plan that we generate together next week.

While I’m at it, I’ll also get some feedback on my expansion plans to computer technology.  Who better to ask than my target audience?


Motorcycle Carburetor Rebuild Part Eleventy-Seven (airbox boots)

The carburetor rebuild grinds on.  It took the better part of a week to get the airbox boots in, and when I opened the bag they came in I’d been charged for four but only got three.  I tried contacting Two Wheel Motorsports to ask if the fourth boot was sitting around there, but they didn’t get back to me.  

The Concours uses two types of boots to connect the carbs to the airbox and one of the old ones still had pretty good flexibility in it, so I used the three new ones and the best of the old ones.

I tried for the better part of two hours to get the carbs mated to the airbox properly with the stiff, old airbox boots without success.  With my home-made hooked screwdriver (to slip the boots onto the intakes) it took about ten minutes of adjusting to get a good seal on all four carbs.  If you’re doing an old carb rebuild, buy some new airbox boots, it’ll save you a  lot of frustration and swearing.

The old airbox boots look rough, but the real issue is that the rubber has hardened over time and no amount of heat will soften them up.  The new boots were supple and easily went on the carb air intakes with minimal fuss and bother.
I pay for four and get three.  Fortunately one of the old ones was still pretty supple so I could reuse it.
Ten minutes and the carbs are back in place.  Get new airbox boots if you’re rebuilding an old carb!