Dealing With The Impossible

Two decade old parts mean things don’t fit together.
Making something work in this circumstance seldom
has anything to do with following directions

The other day I was trying to install carburetors on an old motorcycle (I was a millwright before I was an IT guy). I wasn’t even sure if what I was doing was possible. I spent a couple of frustrating hours trying before I pulled it all apart and did it over a different way.

What I love about technology and engineering, especially when it involves free-form building rather than following directions, is that you have no idea if what you’re doing is possible. This never happens in digital environments – they’re all designed for you to eventually succeed. Kids think video game wins are wins, they’re not, they’re a conditioned response.

Any teacher who thinks free form building is just for fun is the kind of teacher who only wants students to perform conditioned response with a predetermined outcome (I’m guessing so they can control the situation). A lot of people (students and teachers alike) think that’s learning. I think it’s all about management and control, and it’s one of the emptiest things we can do with students.

We shy away from stochastic processes in the classroom because we believe that failure is the inability to do something rather than an opportunity to better understand complex and open ended situations.

When trying to put together those carburetors I was unsure if the process I followed would lead to a successful outcome.  That uncertainty filled me with doubt and made me question what I was doing in a way that no lesson ever would.  We desperately hope for metacognition in student learning and then stifle it with overly restrictive learning goals.  No student ever starts a math problem, writes an essay or even plays a video game wondering if what they are doing is possible, yet most of the world, when it isn’t a digital distraction or a lesson, works that way.  I suspect the cockiness I see in student attempts at engineering is grounded in the fact that most of their world (digital, educational, or worst of all: both!)  is a coddled exercise rather than a stringent test of reality.

In a classroom we like controlled circumstances with defined and plausible outcomes because they suit easy analysis of work completion, collection of assessment data and cement the teacher’s place as the all knowing master of learning, but that limited circumstance doesn’t offer much in the way of learning real world outcomes.

What would a learning environment look like if it wasn’t modelled on data collection and teacher insecurities?

Head Space

For the first time in my ten years of teaching I didn’t teach summer school or take an additional qualification this summer.  I did build a deck that you can land a helicopter on, restore a motorbike I found in a field and travelled across most of Ontario, but I’ve been far away from thinking about teaching.

What have I learned from my summer of George?  I’d be a very good retired person.  I’m seldom idle, I love learning new things and resolving engineering challenges.  I get a great deal of satisfaction in taking something broken and making it work.  Mechanical sympathy has always led me into technology, I tend toward an empathetic connection with machines.  I also enjoy working with my head and hands in concert (not just one or the other).  I spent the summer practising the engineering process, perhaps I can take a more active modelling role in the lab in order to keep that experience alive (for myself as well as for my students).

The writing didn’t slow down, it just changed focus.  Putting experience into words allows me to meditate on that experience and clarify my thinking about it.  It’s nice to know that whatever I’m doing, writing is a natural response to it.

I’m now in the process of re-engaging with teaching.  Empathy tends to lead me in this as well, though I find the irrationality and randomness of dealing with people exhausting and frustrating in comparison to the simple honesty of machines.  The education system is all about people, from the social complexities of dealing with fellow teachers and administration to the hugely varied psychology of students, it’s a complex system that is more about fecundity than resolution.

After a summer of making things work I’m most anxious about returning to a process that is often irrational, opaque and unsolvable.

Once more into the breach dear friends…

Changing Motorcycle Fork Oil

A three legged Tiger.

Changing fork oil turned out to be pretty straightforward.  The most time consuming part is removing any niggly body panels so you can get at the forks themselves.   Make sure you loosen the top fork plug before you remove the forks as you need the forks firmly held while you do that and the clamps on the bike are designed to do just that.  Once you’re there, undoing the clamps that hold the forks means they’ll slide right out, so be ready for that.

The spring on the Tiger is a
progressive rate unit – it is
sprung tighter the lower it
goes.

Once on the work bench it was a matter of taking off the rubber fork protectors and cleaning up the unit.  I then slowly removed the top of the fork using a 22mm ratchet while keeping pressure on.  The book said the cap is under ‘considerable’ pressure from the spring, but with the fork fully extended it released quite gently.  With the cap off I removed a spacer, a washer and the spring slowly as the fork is full of oil.  Pulling the spring out quickly means you’re pulling oil out and making a mess.  With the parts out I inverted the shock assembly and poured the old oil out into a measured container to see how much was in there and what condition is was in.


The oil came out looking pretty dark – the new stuff was completely transparent.  Since the previous owner didn’t appear to change the oil in the engine, I doubt fork oil ever got looked at; this stuff has probably been in there a while.  There was no corrosion in or on the forks themselves or on the internal components, so after a cleanup I poured 710ml of new fork oil into the fully compressed fork.  I had to raise the fork to install the spring, washer and spacer and then put the cap back on snug.  I later tightened it to torque specs when it was reinstalled on the bike.

Spring number two gave me about 660ml of oil after a good emptying.  The first one was at about 650ml.  It got refilled to 710mm of heavier 15 weight fork oil to reduce the floatiness of the front fork and deal with my weight better.  I’m looking forward to feeling the difference when the snows clear.

If you’ve got a bike with fairings I’d guess a fork oil change would take you an easy afternoon of work.  If you’ve got a naked bike then this is a matter of removing the front wheel and brake calipers, loosening the top cap, loosening two clamp bolts on the triple tree and handlebar clamps and sliding the fork out.  Removing the cap and internal components and emptying the old oil would only take about ten minutes per fork.  Refilling a compressed, empty fork with the required amount of fork oil and putting it all back together another ten minutes.  Once you were familiar with the process on your naked bike it wouldn’t take more than an hour to do a fork oil change – longer if you have a lot of finicky fairings to remove.

The left photo is of the fork assembly off the bike prior to removing the rubber fork gaiter (which cleaned up nicely with warm soap water and then some Armourall).  On the right:  all back together again.  The front wheel got regreased and cleaned up.  The speedo housing was especially mucky.


LINK to the specs research I did on fork oil changes on this particular Triumph Tiger.

The other fork had about 650ml in it – pretty black considering it was clear when it went in.


from Blogger http://ift.tt/2jNmaae
via IFTTT

Perseverance & Patience

Steady on, it’s not that bad.  I shall persevere!

The never ending tale of Concours carburetors continues.  My most recent attempt was to check the fuel amounts in each bowl and then reinstall and test (I’m getting very quick at this).

Once again the old Connie coughs and backfires and dies on throttle application.  The removals and re-installations have upset the old connectors between the carbs, which have developed a gas leak, so the whole thing came off (again) and is now apart on the work bench (again).


I contacted the local Kawasaki dealer for parts last weekend, but they’ve been radio silent.  The parts I need were easy enough to find, but maybe 22 year old carb bits aren’t sexy enough to warrant a timely reply.  Maybe I should have ordered them online, in spite of a number of magazines lamenting people’s lack of support for local motorcycle dealers.  Had I ordered them online they’d probably have been here by now.  Instead I’m left wondering if I can even get these parts.

The goal now is to take each carb apart, double check float depths and ensure all the internal jets and such are properly installed, then it’ll all go back together again with new connecting pieces and go back on the bike (again).  With any luck I’ll get some sort of clue that I’m moving in the right direction.  That’s been the most frustrating part of this process.  I make changes and there is no change when I fire it up.  Whatever the problem is, I haven’t come close to touching it yet.  At least a fuel leak is an obvious and easy fix.


Any day now…


Sourcing Parts and Kawasaki Master Brake Cylinders

The rear brake light I ordered on Amazon in December decided to show up today.   I’m going to pass it on to Jeff’s BMW cafe racer project and I think I’m done with four month delivery times from Amazon.  Time to source my parts elsewhere I think.  I’m curious to see how soon the rear brake light I got instead from eBay takes.  I have a feeling it’s going to make the Amazon Marketplace delivery times look sketchy.


Meanwhile, a coolant overflow tank and master brake cylinder kit arrived for the Concours in a timely fashion from Fortnine.  I wish they’d start stocking customization pieces like those all in one LED lighting systems.


The tank looks like it’ll fit nicely on the battery case.  It isn’t as big as the stock one, but the stock one isn’t that big anyway.  I’ve routed the coolant overflow tube and it fits nicely down the spine of the bike.  Where it’s placed means the overflow pipe can stick out the side and not dump in the path of the rear tire.


The master brake cylinder kit took a bit of work to get into.  Getting it off the bike was easy enough, but getting the compression ring out took some fiddling.  I’ve replaced the rubbers on the cylinder and I’m ready to put it back together again, but the kit came with 2 copper rings that don’t seem to be on the original, so I’m going to figure out where they go before I reassemble.

Brake handle and electronic switch removal was straightforward.  The only tricky bit was the snap ring that holds in the master cylinder.  Compressing the cylinder while getting a pair of compression pliers in there
to squeeze the ring into the groove on the cylinder is swear worthy.

The old outer gasket was in pieces before I even started pulling it out.  Rubbers don’t typically last 24 years.
Fancy people pay for that kinda patina – mine comes virtue of the bike being 23 years old and Canadian.

The old gaskets and spring on the cylinder

New gaskets and springs ready to install – as soon as I figure out where the copper rings go.

I don’t see copper rings on there anywhere.  I’m still not sure why the
All Balls Racing master cylinder kit has them, but have them it does.

from Blogger http://ift.tt/2lNIeQk
via IFTTT

Victory!

After a long wait the o-rings finally came in to the dealer.  I then ended up getting the wrong o-rings (it turns out Kawasaki has like half a dozen different o-rings in this carburetor).  Don’t expect to show detailed pictures and get any help from the parts experts either.


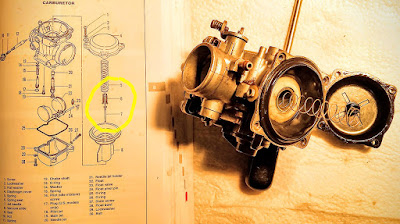
With the o-rings and t-fittings in I was able to put the carb back together again (again).  But before doing that I checked the floats one more time (they were all good), and reset the pilot screws to factory specs.  As I was doing that I noticed that the needles were moving when I flipped the carbs.  A quick check of the diagram showed that the spring seat goes above the pin, not below it, which I’d done (quite embarrassing really – I was tempted not to mention it, but my mistake might prevent someone else’s in the future, so humility – and humiliation – first).

With the pins and seats the right way around I put the carbs back together yet again.  Installing it is as big a pain in the ass as it ever was, with the fitting of airbox boots being a dark art.

With everything reconnected and double checked, the carburetors were ready to go.  I set the petcock to prime to put a lot of fuel in the empty bowls, hit the choke and turned it over…. and it started and idled properly!

As I used to do, I eased off the idle as the bike ran higher and higher as it warmed up.  After a minute I turned the choke off and it was idling at about 1800rpm.  I dialed back the idle speed to 1000rpm and it was running steady.

So far so good, but the issue was applying throttle – the carbs kept flooding, backfiring rich and then killing the motor, would that happen this time?  No!  It’s alive, ALIVE!!!


This video below may be the most satisfying thing I’ve ever filmed.

I now have two working bikes in the garage.  This has been a long and frustrating process, but I’ve gotten the rust off some long unused skills.  I’m taking better organization, attention to detail and theoretical understanding with me as I move onto other mechanical projects.

http://tkmotorcyclediaries.blogspot.ca/search?q=concours+carburetor

If it hasn’t been replaced, it’s been thoroughly gone over.  One carb is complicated,
four carbs is a universe of complications!